How to Master the Black Forest Cake Recipe Easily
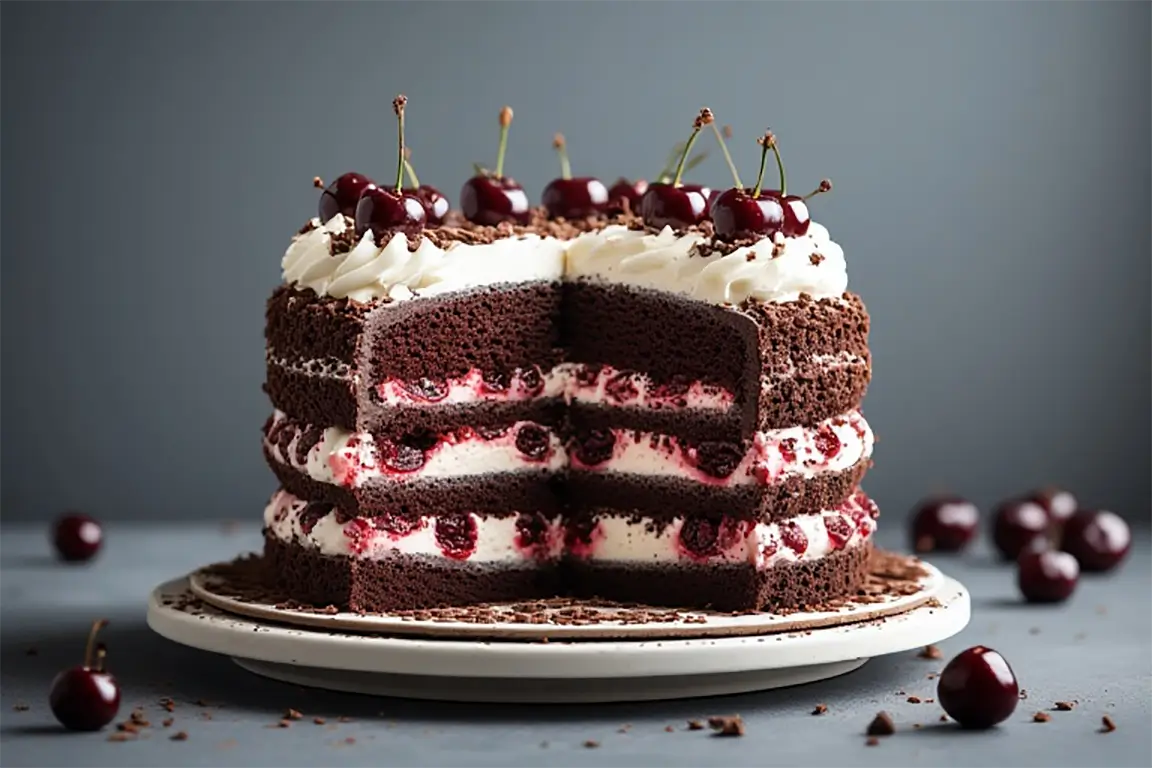
Table of Contents
Introduction
Have you ever found yourself craving a slice of decadent Black Forest cake but felt intimidated by the thought of making it yourself? You’re not alone. The classic German dessert with its layers of chocolate sponge, whipped cream, and cherries may seem daunting, but I’m here to tell you that mastering the black forest cake recipe is much simpler than you might think.
With the right technique and a few insider tips, creating this iconic dessert at home can be both enjoyable and rewarding. This black forest cake approach breaks down the process into manageable steps that even novice bakers can follow with confidence. Whether you’re preparing for a special celebration or simply treating yourself, this comprehensive guide will help you create a Black Forest masterpiece that rivals any bakery version.
Ingredients List
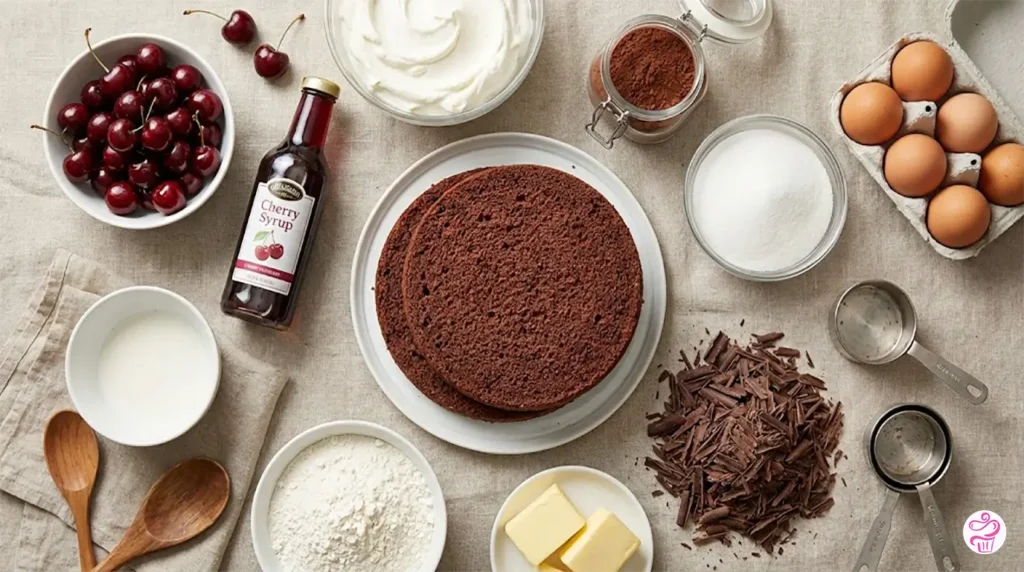
For the Chocolate Cake:
- 2 cups all-purpose flour
- 2 cups granulated sugar
- 3/4 cup unsweetened cocoa powder (high quality for best results)
- 2 teaspoons baking soda
- 1 teaspoon baking powder
- 1 teaspoon salt
- 2 large eggs, room temperature
- 1 cup buttermilk, room temperature
- 1/2 cup vegetable oil
- 2 teaspoons pure vanilla extract
- 1 cup hot coffee (or hot water)
For the Cherry Filling:
- 2 (14.5 oz) cans pitted dark sweet cherries in syrup
- 1/4 cup cherry liqueur (Kirsch) or cherry juice for non-alcoholic version
- 1/4 cup granulated sugar
- 2 tablespoons cornstarch
- 2 tablespoons cold water
For the Whipped Cream Frosting:
- 4 cups heavy whipping cream, cold
- 1/2 cup powdered sugar
- 2 teaspoons vanilla extract
- 1 tablespoon unflavored gelatin (optional, for stability)
- 3 tablespoons cold water (if using gelatin)
For Decoration:
- 8 oz dark chocolate, for chocolate shavings
- 16-20 fresh cherries with stems (maraschino cherries also work)
- Additional chocolate shavings or curls
- 2 tablespoons powdered sugar for dusting (optional)
Timing
- Prep Time: 45 minutes
- Cook Time: 35 minutes
- Cooling Time: 2 hours
- Assembly Time: 30 minutes
- Total Time: 3 hours 50 minutes (saves approximately 30 minutes compared to traditional recipes)
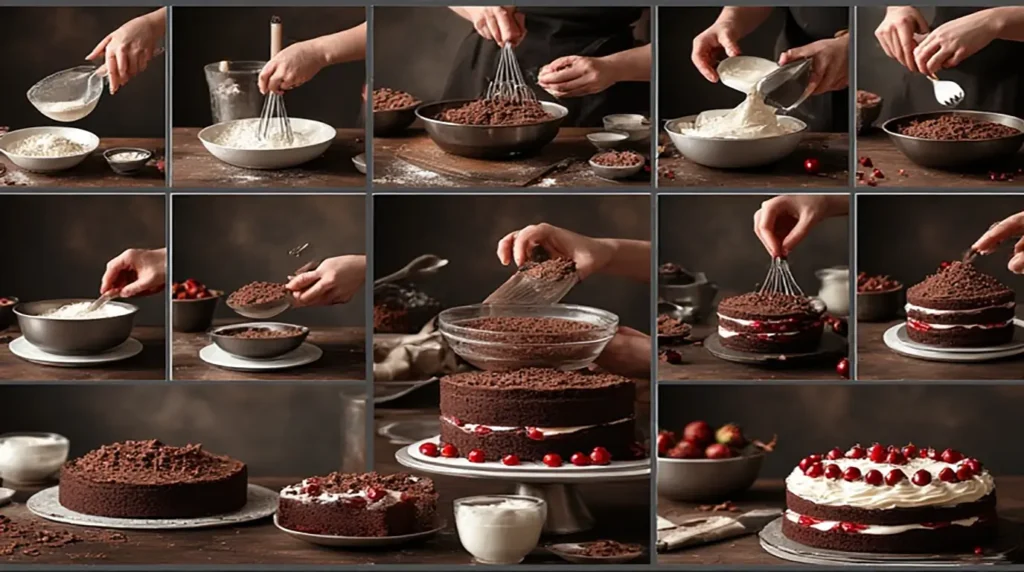
Making the Perfect Black Forest Cake: Step-by-Step
Step 1: Prepare the Cake Layers
- Preheat your oven to 350°F (175°C). Grease and flour three 8-inch round cake pans or line with parchment paper.
- In a large bowl, whisk together the flour, sugar, cocoa powder, baking soda, baking powder, and salt until well combined.
- Add eggs, buttermilk, vegetable oil, and vanilla to the dry ingredients and mix on medium speed for about 2 minutes.
- Slowly add the hot coffee (or water) and mix on low speed until just combined. Don’t worry if the batter seems thin – this creates a moist cake!
- Divide the batter evenly among the prepared pans and bake for 22-25 minutes, or until a toothpick inserted in the center comes out with a few moist crumbs.
- Allow the cakes to cool in the pans for 10 minutes, then remove and place on wire racks to cool completely.
Pro Tip: For the most authentic black forest cake recipe, use a high-quality cocoa powder – it makes a significant difference in the chocolate flavor profile.
Step 2: Prepare the Cherry Filling
- Drain the cherries, reserving 1 cup of the syrup. Place the cherries in a bowl and toss with the cherry liqueur or juice. Let them macerate for at least 30 minutes.
- In a saucepan, combine the reserved cherry syrup and sugar. Bring to a simmer over medium heat.
- In a small bowl, mix cornstarch and cold water until smooth, then stir into the simmering syrup.
- Cook, stirring constantly, until the mixture thickens, about 1-2 minutes.
- Remove from heat and fold in half of the cherries. Allow to cool completely.
- Reserve the remaining cherries for layering between the cake.
Step 3: Make the Whipped Cream Frosting
- If using gelatin for stability: In a small bowl, sprinkle gelatin over cold water and let stand for 5 minutes to bloom. Microwave for 10 seconds until the gelatin dissolves, then cool slightly.
- In a large chilled bowl, whip the heavy cream until it begins to thicken.
- Gradually add powdered sugar and vanilla extract, continuing to whip.
- If using gelatin, slowly pour it into the cream while whipping on low speed.
- Whip until stiff peaks form, being careful not to over-whip.
Step 4: Assemble Your Black Forest Cake
- Level the tops of your cooled cake layers with a serrated knife if needed.
- Place the first cake layer on a serving plate. Brush with 2-3 tablespoons of the reserved cherry liqueur or syrup.
- Spread a thin layer of whipped cream over the cake, then pipe a dam of whipped cream around the edge to prevent the filling from spilling out.
- Spoon half of the cherry filling inside the dam, then top with some of the reserved macerated cherries.
- Place the second cake layer on top and repeat the process.
- Add the final cake layer, brush with remaining liqueur, and frost the entire cake with the remaining whipped cream.
Step 5: Decoration
- Create chocolate shavings by running a vegetable peeler along the edge of a chocolate bar.
- Press chocolate shavings onto the sides of the cake.
- Use a piping bag with a star tip to pipe rosettes of whipped cream around the top edge of the cake.
- Place a fresh cherry on top of each rosette.
- Sprinkle additional chocolate shavings in the center and dust with powdered sugar if desired.
- Refrigerate for at least 1 hour before serving to allow flavors to meld.
Nutritional Information (per slice, based on 12 servings)
- Calories: 580
- Protein: 6g
- Carbohydrates: 65g
- Fat: 32g
- Saturated Fat: 19g
- Fiber: 3g
- Sugar: 45g
- Vitamin A: 20% DV
- Calcium: 10% DV
- Iron: 15% DV
Healthier Alternatives
Creating a lighter version of this classic black forest cake recipe is possible with these substitutions:
- Lower Calorie Option: Use light whipped cream or a mixture of Greek yogurt and whipped cream for the frosting.
- Gluten-Free Version: Substitute all-purpose flour with a 1:1 gluten-free baking flour blend.
- Reduced Sugar Option: Decrease sugar by 25% in the cake batter and use naturally sweetened cherries.
- Dairy-Free Alternative: Use almond milk with a tablespoon of vinegar instead of buttermilk, and coconut cream instead of heavy cream.
- Vegan Adaptation: Replace eggs with flax eggs (1 tbsp ground flaxseed + 3 tbsp water per egg) and use plant-based milk and cream alternatives.
Serving Suggestions
Elevate your easy black forest cake experience with these creative serving ideas:
- Serve slightly chilled for the perfect texture contrast between the moist cake and firm cream.
- Pair with a shot of espresso or a small glass of cherry liqueur for an adult dessert experience.
- For an elegant presentation, serve on chilled plates with a cherry coulis drizzle.
- Add a scoop of vanilla ice cream on the side for an indulgent contrast.
- For special occasions, garnish the plate with edible gold dust or fresh seasonal berries.
Common Mistakes to Avoid
Even the most experienced bakers can fall prey to these common pitfalls when making Black Forest cake:
- Overworking the batter: Mix just until combined to avoid a tough cake texture.
- Using warm layers: Ensure cake layers are completely cooled before assembly to prevent melting the whipped cream.
- Under-whipping the cream: Whip until stiff peaks form for a stable frosting that won’t collapse.
- Skipping the cherry liqueur: This ingredient adds authentic flavor; if omitting, enhance cherry syrup with almond extract.
- Rushing the assembly: Take your time layering for a stable, beautiful cake that won’t slide or leak.
- Decorating too far in advance: Add fresh cherries close to serving time to prevent them from bleeding into the cream.
Storing Tips
Properly storing your Black Forest cake ensures it remains fresh and delicious:
- Store in the refrigerator, covered with a cake dome or loosely with plastic wrap, for up to 3 days.
- For best results, consume within 48 hours when the flavors are perfectly melded.
- If freezing, wrap individual slices tightly in plastic wrap and then aluminum foil. They will keep for up to 2 months.
- To thaw frozen cake, transfer to the refrigerator overnight rather than using room temperature.
- Remove from the refrigerator 20-30 minutes before serving for optimal flavor and texture.
Conclusion
Mastering the black forest cake recipe doesn’t require professional pastry skills – just patience, quality ingredients, and the right technique. This classic dessert, with its rich chocolate layers, tart cherries, and cloud-like whipped cream, creates a memorable experience for any occasion. The beauty of this recipe lies in its balance of flavors and the impressive presentation that comes together with surprisingly simple steps. Whether you’re a seasoned baker or trying your hand at layer cakes for the first time, this approachable method delivers consistent, delicious results. I encourage you to give this Black Forest cake a try – and don’t forget to take photos of your creation before that first heavenly slice disappears!
FAQs
Can I make this Black Forest cake without alcohol?
Absolutely! While traditional black forest cake recipe calls for Kirsch (cherry liqueur), you can easily substitute with cherry juice, cherry syrup, or even a combination of water with a splash of almond extract for a similar flavor profile without the alcohol.
Why is my whipped cream frosting not holding its shape?
If your whipped cream isn’t stable, make sure you’re using very cold heavy cream and chilled bowls and beaters. For extra stability, add the optional gelatin as described in the recipe, or substitute up to 4 ounces of mascarpone cheese whipped with the cream.
Can I use fresh cherries instead of canned for this recipe?
Yes! When cherries are in season, pit about 1.5 pounds of fresh cherries and cook them with 1/2 cup sugar and 2 tablespoons of lemon juice until they release their juices. Proceed with the cornstarch thickening as directed in the recipe. This creates a more vibrant, fresh cherry flavor.
How far in advance can I make this cake?
You can prepare the cake layers up to 2 days ahead and store them wrapped at room temperature. The cherry filling can be made 3 days ahead and refrigerated. For best results, assemble the cake no more than 24 hours before serving, keeping it refrigerated until about 30 minutes before serving.
My cake layers didn’t rise well. What went wrong?
This could be due to expired leavening agents (baking powder/soda), overmixing the batter, or an oven that wasn’t properly preheated. For perfect chocolate cake layers, make sure your ingredients are fresh, mix just until combined, and allow your oven to fully preheat before baking.
How did you like the recipe?
Well worth all the steps
This is a time consuming cake but worth every minute. Made it for my close friend’s 40th birthday because Black Forest is her favorite.
I did a non alcoholic version using 1tsp of almond extract in the cherry juice and it was perfect. I did use a TBS of vanilla in the whipped cream and next time might add a bit more sugar. Wish I could share a picture it came out beautiful