Easy Ezekiel Bread Recipe: Healthy Homemade Bread
If you’ve been curious about sprouted-grain loaves but don’t want to pay specialty-bread prices, this ezekiel bread recipe is a solid place to start. You get a hearty, slightly sweet, nutty bread that feels substantial—without needing a mixer or any fancy shaping. It’s one of those healthy bread recipes I keep coming back to when sandwich bread starts feeling a little too soft and snacky.
Ezekiel-style bread is typically built from sprouted grains and legumes, which brings a deeper flavor and a pleasantly dense crumb. This homemade version keeps the spirit of it while using easy-to-find sprouted flours so you can bake it in a regular loaf pan.
Table of Contents
Timing & yield (so you can plan)
- Total time: about 3 hours (mostly hands-off rising)
- Active time: 20–25 minutes
- Yield: 1 loaf (8 1/2 x 4 1/2-inch pan), about 12 slices
Ingredients (what you’ll need)
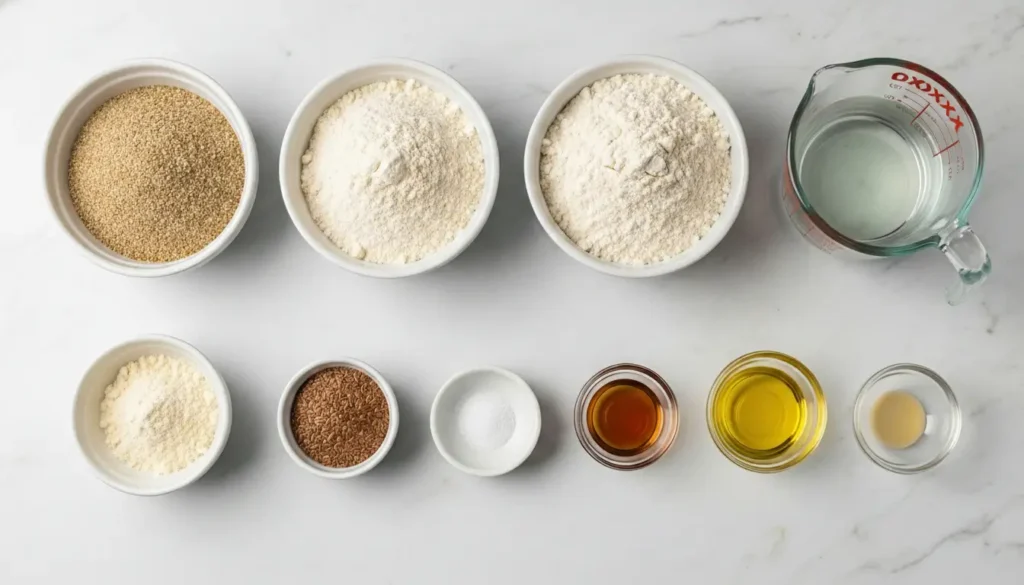
Dry
- 1 1/4 cups (150g) sprouted whole wheat flour
- 1/2 cup (60g) sprouted spelt flour (or more sprouted wheat)
- 1/3 cup (40g) sprouted lentil flour
- 3 tablespoons (25g) chickpea flour (or sprouted garbanzo flour)
- 2 tablespoons (18g) ground flaxseed
- 1 1/4 teaspoons fine salt
- 2 1/4 teaspoons instant yeast (1 packet)
Wet
- 1 1/4 cups (300g) warm water (about 105–110°F / 40–43°C)
- 2 tablespoons olive oil
- 1 tablespoon honey or maple syrup (optional, but helps the yeast and softens the bite)
- 1 tablespoon apple cider vinegar (helps the loaf taste less “bean-y”)
Optional (for a taller loaf)
- 1–2 tablespoons vital wheat gluten (especially helpful if you swap in more legume flour)
A couple quick tips before you start
- This dough is stickier than classic sandwich bread. Don’t keep adding flour until it “looks right,” or you’ll end up with a dry loaf.
- If your kitchen is cool, give the dough a warmer spot to rise (inside an off oven with the light on works well).
Step-by-step
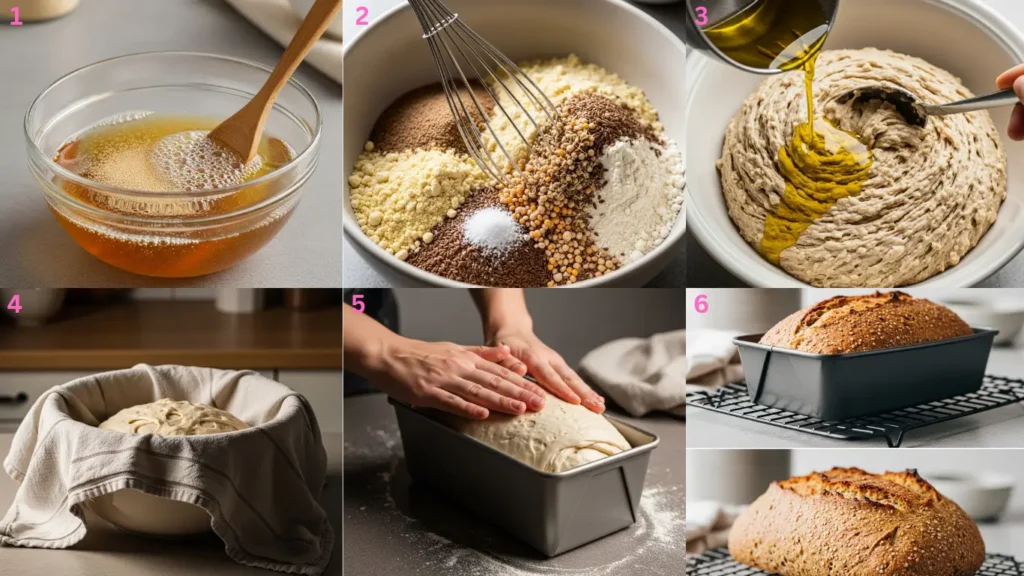
Step 1: Bloom the yeast
Stir the warm water and honey (if using) together, then sprinkle in the yeast. Let it sit for 5 minutes until it looks foamy—if nothing happens, your water may have been too hot or your yeast is old.
Step 2: Mix the dry ingredients
In a large bowl, whisk together the sprouted flours, lentil flour, chickpea flour, flaxseed, salt, and vital wheat gluten (if using). This quick whisk helps prevent pockets of bean flour, which can bake up bitter.
Step 3: Make a sticky dough
Pour the yeast mixture into the bowl, then add olive oil and vinegar. Stir with a sturdy spoon until you don’t see dry flour; the dough will look shaggy and tacky, more like thick oatmeal than a kneadable ball.
Step 4: First rise (don’t rush this)
Cover the bowl and let the dough rise until slightly puffy and about 1 1/2 times the size, 60–90 minutes. Practical warning: if you let it go too long in a very warm spot, it can overproof and collapse later—aim for “expanded,” not “billowy.”
Step 5: Pan it and rise again
Oil your loaf pan well (or line with parchment). Scrape the dough into the pan, wet your fingers, and smooth the top; let it rise 30–45 minutes, until the highest point is about 1 inch over the rim.
Step 6: Bake, then cool completely
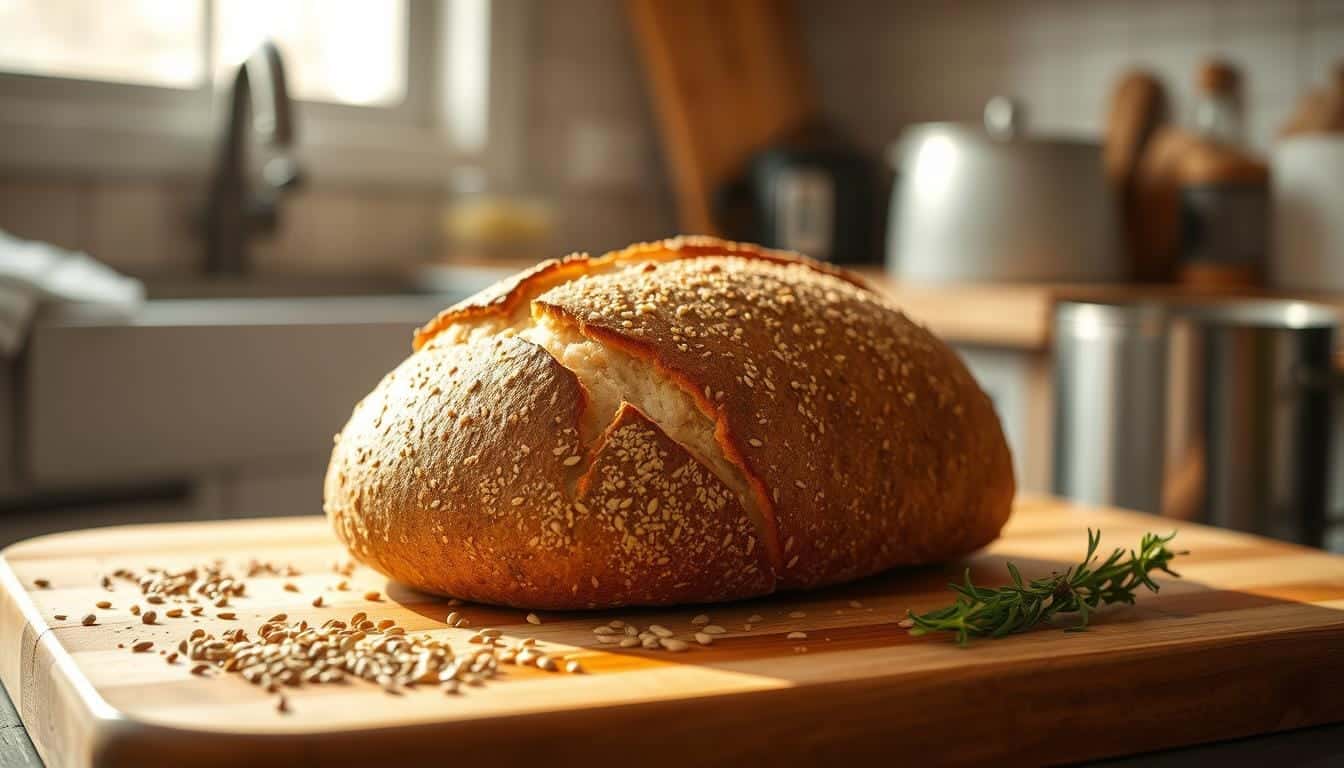
Bake at 375°F (190°C) for 38–45 minutes, until deeply browned and the center registers about 200–205°F (93–96°C) if you have a thermometer. Cool in the pan 10 minutes, then remove to a rack and cool at least 90 minutes before slicing—cutting early is the fastest way to get a gummy crumb.
A lesson from my kitchen (the slice that taught me patience)
The first time I tested this loaf, I baked it at 350°F for 35 minutes because I was treating it like my usual whole wheat sandwich bread. It looked done on top, but when I sliced it after only 30 minutes of cooling, the center compressed into a damp, almost paste-like layer.
Here’s what fixed it on the next bake: I raised the oven to 375°F, baked an extra 8 minutes, and—this was the big one—cooled the loaf for a full 2 hours before slicing. The crumb set up, the flavor mellowed, and the slices held together for toast without tearing.
Why this bread works (even with beans in the mix)
Legume flours add protein and a savory depth, but they can weigh a dough down. Using sprouted wheat/spelt as the base (and optional vital wheat gluten) keeps enough structure for a loaf that rises nicely without turning cakey. The small amount of vinegar helps round out the flavor so the beans don’t dominate.
If you’re collecting healthy bread recipes, this one earns its place because it’s filling, slices cleanly once cooled, and toasts beautifully.
Variations you’ll actually use
- No spelt? Replace the sprouted spelt flour with more sprouted whole wheat flour.
- Want seeds on top? Brush the risen loaf with water and sprinkle sesame, sunflower, or pumpkin seeds right before baking.
- Prefer it a little softer? Add 1 extra tablespoon olive oil. The crumb stays tender longer, especially if you refrigerate the loaf.
Serving ideas
- Toast and top with salted butter and cinnamon (simple, but perfect).
- Use for open-faced egg sandwiches—the sturdy crumb holds up well.
- Cube and dry for croutons; the nutty flavor is great on soup.
Storage & freezing
Store the loaf tightly wrapped at room temperature for up to 2 days, or refrigerate for 5–6 days (toast slices to bring back the texture). For freezing, slice first, then freeze with parchment between slices so you can pull out exactly what you need.
Frequently asked questions
Is this a true sprouted loaf?
It’s a practical home version using sprouted flours, which gives you the sprouted-grain character without the full sprout-dry-grind process. If you want to read more about what “sprouted bread” means traditionally, this trusted source is a helpful overview.
Can I make this ezekiel bread recipe without yeast?
Not with the same results. You can try baking powder/soda quick-bread style, but you’ll lose the classic chewy slice and it won’t toast the same.
Why is my loaf dense?
This style is naturally hearty, but extreme density usually means the dough was too dry (extra flour added), under-risen, or sliced before fully cooled.
Closing note
Once you’ve baked this ezekiel bread recipe a couple times, you’ll get a feel for the rise and the bake color you like. It’s one of those healthy bread recipes where small tweaks (a few minutes longer in the oven, a longer cool on the rack) make the difference between “pretty good” and “I’m making this again next week.”
How did you like the recipe?
There are no reviews yet. Be the first one to write one.