Easy Homemade Cake Popsicles in 5 Steps

Table of Contents
Introduction
Ever wondered how to transform ordinary cake into a delightful frozen treat? cake popsicles recipe combines the beloved cake pop concept with the refreshing appeal of popsicles, creating a stunning dessert perfect for parties, summer gatherings, or whenever you need a sweet pick-me-up.
Unlike traditional cake pop tutorial approaches, these treats are shaped like popsicles, making them even more fun to eat and decorate. In this comprehensive guide, I’ll walk you through creating these delectable treats in just 5 simple steps, complete with tips and tricks from professional bakers.
Ingredients List

For the cake base:
- 1 fully baked 9-inch cake (any flavor you prefer – chocolate, vanilla, or red velvet work wonderfully)
- 1/2 cup frosting (matching or complementary to your cake flavor)
- 8 oz high-quality white chocolate or candy melts
- 8 oz colored candy melts or chocolate (for decorating)
- 2 tablespoons vegetable oil (optional, for thinning chocolate)
For decoration:
- Assorted sprinkles, crushed cookies, or nuts
- Food coloring (gel-based works best)
- Popsicle sticks (8-10 depending on size)
Substitution options:
- Use cream cheese instead of frosting for a tangier flavor
- Dairy-free chocolate and frosting work well for lactose-intolerant guests
- Consider using cake mix if short on time (though homemade cake produces superior results)
Timing
Prep time: 30 minutes
Freezing time: 2 hours (minimum)
Decorating time: 30 minutes
Total time: 3 hours
This recipe offers a significant time advantage over traditional layered cakes, which typically require 4+ hours from start to finish. Additionally, most of the time is passive freezing, allowing you to multitask while your cake popsicles set.
Step 1: Prepare Your Cake Base
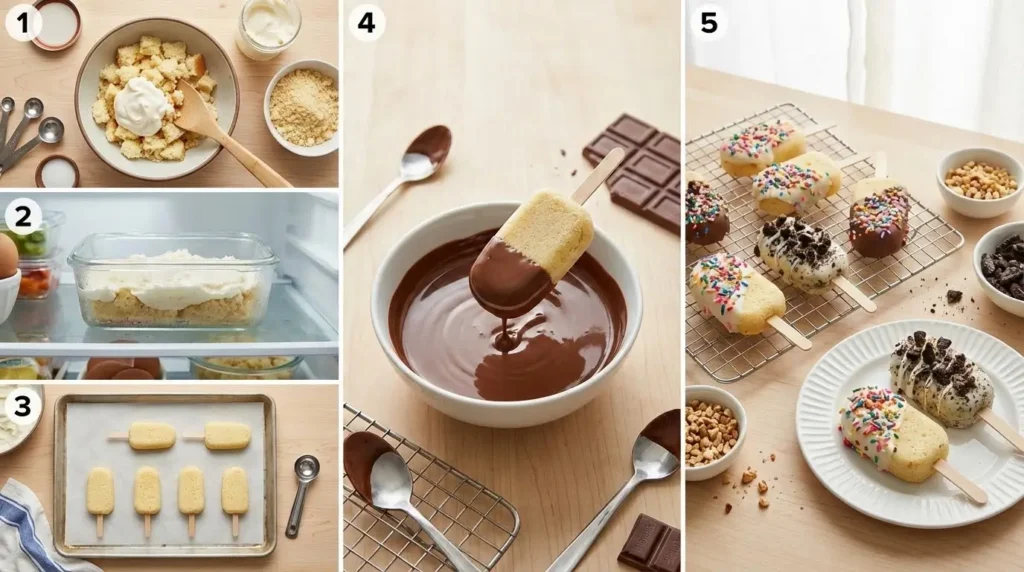
Begin by crumbling your cooled cake into fine crumbs in a large mixing bowl. Use your hands or a fork to break down any larger pieces until you have a consistent texture throughout. The finer the crumbs, the smoother your cake popsicles will be.
Pro tip: If using a store-bought cake, remove any thick frosting layers before crumbling to maintain better control over the moisture level.
Step 2: Mix in Frosting and Form Shapes
Add your frosting to the cake crumbs gradually, starting with about 1/3 cup. Mix thoroughly with a spatula or clean hands until the mixture resembles play-dough consistency—moist enough to hold together when pressed but not so wet that it’s sticky.
Key insight: According to professional bakers, the most common mistake is adding too much frosting, resulting in popsicles that are too soft. Test the mixture by forming a small ball—if it holds its shape, you’ve got the perfect consistency.
Shape the mixture into popsicle forms using a popsicle mold or by hand-forming rectangular shapes about 3×2 inches and 3/4 inch thick. Insert popsicle sticks into each form.
Step 3: Freeze the Shaped Cake Pops
Place your shaped cake popsicles on a parchment-lined baking sheet and freeze for at least 2 hours or overnight. This crucial step ensures they maintain their shape during dipping and prevents the warm chocolate from causing them to fall apart.
Timesaver: If you’re in a hurry, place them in the freezer for 30 minutes, then transfer to the refrigerator for another 30 minutes. This prevents the extreme temperature difference that can cause cracking when dipping frozen popsicles in warm chocolate.
Step 4: Dip in Chocolate Coating
Melt your white chocolate or candy melts in a microwave-safe bowl, heating in 30-second intervals and stirring between each until completely smooth. If the chocolate seems too thick, add 1-2 teaspoons of vegetable oil to thin it to a dipping consistency.
Working quickly with one popsicle at a time, dip each frozen cake pop into the melted chocolate, using a spoon to help coat all sides evenly. Gently tap off excess chocolate and place back on the parchment paper.
Expert trick: For a professional finish, don’t double-dip! If you need more coverage, use a spoon to patch any thin areas rather than re-dipping the entire popsicle.
Step 5: Decorate and Set
While the coating is still wet, sprinkle with your choice of decorations or drizzle with contrasting colored chocolate. Work quickly as the cold cake center will cause the chocolate to set faster than you might expect.
Return the decorated cake popsicles to the refrigerator for 15 minutes to fully set the chocolate coating.
Creativity boost: Create color blocks by dipping half the popsicle in one color and half in another, or use small food-safe paintbrushes to add details after the base coat has set.
Nutritional Information
Per cake popsicle (approximate values):
- Calories: 280
- Protein: 3g
- Carbohydrates: 32g
- Fat: 16g
- Fiber: 0.5g
- Sugar: 26g
These values may vary depending on your specific cake recipe and decoration choices.
Healthier Alternatives for the Recipe
- Reduced-sugar option: Use a sugar-free cake recipe and sugar-free frosting to reduce overall sugar content by up to 40%.
- Gluten-free version: Substitute with your favorite gluten-free cake mix or recipe.
- Vegan adaptation: Use plant-based cake recipes, dairy-free frosting, and vegan chocolate alternatives.
- Protein boost: Add 2 tablespoons of protein powder to the cake crumb mixture for added nutritional value.
Serving Suggestions
Serve these cake popsicles on a decorative platter with a sprinkle of edible glitter for special occasions. For a complete dessert experience, pair with:
- Fresh berries for a tangy contrast
- A small scoop of complementary ice cream
- Coffee or milk for adults and children respectively
- Arrange on a tiered stand for an impressive dessert table centerpiece
Common Mistakes to Avoid
- Too much frosting: This makes the mixture too soft to hold its shape.
- Skipping the freezing step: Patience is key—insufficiently frozen popsicles will fall apart when dipped.
- Chocolate too hot: Overheated chocolate can melt your frozen cake pops. Let it cool slightly after melting.
- Rushing the process: Each step requires proper time; shortcuts often lead to disappointing results.
Storing Tips for the Recipe
These cake popsicles can be stored in an airtight container in the refrigerator for up to 5 days. For longer storage, keep them in the freezer for up to 3 months.
For best results: When freezing, place them in a single layer until frozen solid, then transfer to a container with parchment paper between layers.
Serving from frozen: Allow frozen cake popsicles to thaw in the refrigerator for 1-2 hours before serving for the best texture and flavor experience.
Conclusion
Creating these delightful cake popsicles brings together the best of cake pops and frozen treats in a visually stunning and delicious dessert. They’re perfect for birthdays, summer gatherings, or whenever you want to impress guests with minimal effort. The versatility of this recipe allows for endless flavor combinations and decorative options, making it a go-to dessert for any occasion.
Ready to give this recipe a try? I’d love to hear about your creative variations and see pictures of your finished cake popsicles in the comments section below!
FAQs
Can I use box cake mix for this recipe?
Absolutely! Box cake mixes work perfectly for cake popsicles and can save significant preparation time. Just be sure to follow the box instructions precisely for best results.
Why did my chocolate coating crack?
Chocolate coating typically cracks when there’s too extreme a temperature difference between the frozen cake pop and the warm chocolate. Let your pops warm slightly in the refrigerator before dipping, and ensure your chocolate isn’t too hot.
How far in advance can I make these for a party?
You can make these up to 3 days in advance and store them in the refrigerator. For best appearance, decorate them the day before or the day of your event.
Can I use regular frosting instead of candy melts for coating?
No, frosting won’t set properly as a coating. Candy melts, chocolate, or confectionery coating are necessary for the proper shell-like exterior that defines cake popsicles.
Why are my cake pops too dense/heavy?
This typically happens when too much frosting is added to the cake crumbs. Start with less frosting than you think you need, and add more gradually until you reach the ideal consistency.
How did you like the recipe?
There are no reviews yet. Be the first one to write one.